
Monday, December 31, 2007
*headtodesk*
Friday, December 28, 2007
Long time with no update
I know with the holiday, life's been kinda zany. I haven't heard from Kathy W. - my blog candy winner. If anyone knows Kathy, please let her know she needs to get in touch with me. It's hard to be patient. If I don't hear from her by next Thursday, I'll use random.org to get choose another winner.
Friday, December 21, 2007
And the Blog Candy Winner is....
Kathy, please email me at deipara@yahoo.com with your address so I can send your candy to you.
If you could, please put the words "blog candy" in the title, so I don't accidently mark it as spam or delete it. :)
Thursday, December 20, 2007
STVV04 - I'd rather play at...
It's another Shel Silverstein poem this week. One that's a lot shorter than "The Unicorn."
I will not play at tug o' war.
I'd rather play at hug o' war,
Where everyone hugs
Instead of tugs,
Where everyone giggles
And rolls on the rug,
Where everyone kisses,
And everyone grins,
And everyone cuddles,
And everyone wins.

- I decided to make a Big Buckle card. Tutorial by Beate is here: http://www.splitcoaststampers.com/resources/bucklecard.php
- Card base is Always Artichoke
- Inside is Real Red and Dashing DP
- My strap is Chocolate Chip
- Huggybellas and "need a hug" are both by Stamping Bella. Huggybellas are stamped in Versafine black colored in with Prismacolor pencils on Very Vanilla.
- Brads finish it off.
Don't forget - one day left for blog candy!!!!
Wednesday, December 19, 2007
A Unique Inspiration Challenge
Today - we're searching out blogs to find a card that we want to CASE.
So off I went stopping off here to start with the list of blogs I read. And I found this card at Mabie Stampin' - http://mabiestampin.blogspot.com/2007/12/another-quick-card.html
It's pretty. I love it. It's also quick.
Now, my card is completely different from Silvia's. I think the only things we have in common are image placement and the fact that we used organdy ribbon.
I just got my package from Stamping Bella that I ordered about 10 days ago - how could I resist using my brand new Bellas?

- Card base is Georgia-Pacific White. It's heavier than SU Whisper White (110lb vs. 80lb) and Versafine black sinks into it beautifully - no smearing.
- My brand-new Cuppacakeabella arrived yesterday (along with other Bellas) and I was itching to use her on a card. She's inked in Versafine black and colored in with Prismacolor pencils.
- "Enjoy Life" is another one of my brand-new Bella stamps and is inked in Cameo Coral.
- The cherry on the cupcake and some of the spots on Bella's dress are coated in Sakura Clear Glaze pen. A lot easier to use than Diamond Glaze.
- Celery organdy ribbon finishes off the card.
Don't forget about my blog candy! I'll choose the winner Friday night/Saturday morning, so it's still up for grabs!
Monday, December 17, 2007
I'm over 1,000 hits!
- A set of Rhonda Farrer Second Nature clear stamps
- 2 - 3 yard lengths of velvet ribbon
- Assortment of K&Co. paper - various sizes
- 1 package of Spare Parts brads
- 1 package of Spare Parts eyelets
- 1 package of Spare Parts Gemstones

I work with kids - and we all know kids say the darnedest things. I shivered for some reason at snacktime and said as much. One of the kids pipes up with, "Shiver me timbers! I learned that from Pirates of the Bean." Me: "Pirates of the Bean? Is that a new Vegitales show?" Another teacher: "Sara, I think he means Pirates of the Caribbean." Kid: "yep. Pirates of the Bean."
I wanted to share my cute story, and your entry into this blog candy is to tell a cute "A kid said this..." story.
I've been over to random.org and played (and now know what to use), so I'll be using random.org to choose my winner. Blog candy ends midnight Friday/Saturday.
I can't wait to read your stories!
Sunday, December 16, 2007
Selling cards: the reveal

- Instructions: "Decorative crystals with black and turquoise tones."
- Hmm... No idea given on the image. Thankfully I have my new favorite stamp set - Baby It's Cold Outside by MFT.
- Paper: Taken with Teal, Tempting Turquoise, Basic Black, Whisper White
- Rhinestones, ribbon, ticket corner punch, dimensionals, prismacolor pencils, baby oil were used on this card.
- Print Pattern background is colored in with the Taken with Teal, Tempting Turquoise, and Basic Black markers.

- Directions: "Fairies with pink tones."
- No Fairy stamps. Got the okay to use the stamp from Baby It's Cold Outside.
- Pretty in Pink, Regal Rose and white cardstock. Rose Red dp - in strips and also pieced into her coat.
- Background is snowflakes from Papertrey's Snowflake Serenade.
- Boots and scarf colored in with Prismacolor pencils.
- White brads and dimensionals added.

- Directions: "Snowman with blue tones."
- I explained what the Penny Black Frosty stamp looked like and she liked it, so I stamped it twice, masking to get the second snowman behind the first.
- I used a Prismacolor grey pencil to shade the snowman slightly.
- The snow is sparkled with a quickie glue pen and glitter.
- Background is Blue Bayou and Soft Sky dp colored blocked on a Blue Bayou card.
- Snowflake brads and dimensionals finish it off.

- Directions: "Santa with red and white tones."
- Santa? Check. Do I want to use just red and white? Not really.
- Card base is River Rock. DP is Dashing.
- Santa's colored in with Prismacolor pencils and baby oil.
- Ribbon and brads finish the card off.

- Directions: "Purses with pink tones."
- Purses - I have... with shopping ladies, courtesy of MFT. :)
- Paper: Pretty in Pink, Pixie Pink, White, Rose Red DP.
- Image is colored in with Prismacolor pencils and baby oil. Some shopping bags are paper pieced with Rose Red dp.
- Brads, bauble and dimensional finish this off.

- Directions: "Purses with red, pink, silver and midnight blue tones."
- Hmm... red, pink, silver, and navy... check! Shoppers are out again, courtesy of MFT's Say Charge
- Background paper is the shopping bag (or big purse) from Say Charge stamped in Real Red, Night of Navy, Pixie Pink and Versamark embossed in silver ep.
- Main image is colored in with Prismacolor pencils and baby oil. Silver bag is paper pieced and a bauble is the center of the flower.
I think I did a pretty good job with the cards. :)
Saturday, December 15, 2007
Selling cards
I wound up in the same room as my boss (I was keeping an eye on the kindergartners who still needed to finish lunch) and we were talking about cards. She was hesistant about asking me this, but she finally asked me to make her some thank you cards. She had ideas of what they should look like and she was willing to pay me for them. I was flattered. I like making cards (if you haven't figured that out) and if I get paid for them, that's great.
Later on in the day, I get called back to see her and she has her list of what she wants for a card - colors, ideas on what to put on them, etc. We had to do a little negotiating because I don't have everything she wants, but overall she trusts me.
I can't wait to see how these cards turn out. I'll definitely post pictures.
Thursday, December 13, 2007
STVV03: Shel Silverstein

- Card base is Certainly Celery.
- Background layer is Chatterbox Gingerbread Plaid (at least the opposite side of the paper is) Corners are punched with the ticket corner.
- Main image is the elephant from MFT stamps - It's a Jungle Out There. I stamped 1 in Palette Charcoal ink and masked it off to stamp elephant #2. They're colored in with a grey Prismacolor pencil and baby oil. Tusks and toes are colored in with a white gel pen.
- Main image is cut out with a round Coluzzle and the edges sponged with Certainly Celery ink. The grass is another stamp out of the It's a Jungle set and is inked in Wild Wasabi.
- Sentiment is from MFT - Essential Sentiments (can you tell I got some new stamps? ) It's inked in Certainly Celery on watercolor paper and is punched out with the word window punch.
- Primas are held together with an SEI brad and are popped up on dimensionals.
WT Challenge

Ways to Use It Challenge. Today is was monochromatic cards. These cards always look so pretty and elegant - but you need to make sure the colors go together. Honestly, I have an SU Color Coach - monochromatic cards are all I seem to use it for now.
Nitty Gritty time:
- Card base is Bashful Blue.
- On the bottom of the card (where you write), I turned it up 1" and closed the sides off with brads to create a gift card pocket.
- The main image is from My Favorite Things Stamps - Baby It's Cold Outside. Stamped in Versafine black on watercolor paper, it's colored in with SU! Markers and shaded/blended with blender pens.
- The sentiment is from MFT - Essential Sentiments and is stamped in Bashful Blue. It's stamped on Bohemia dp by My Mind's Eye.
- Blue velvet ribbon is the finishing touch.
The thing I learned today: Well, technically it was last night, but I was looking at the tutorial by Julie (she's over in my blog list) on how to color with SU markers to make them look like Copics (more expensive alcohol markers) and she uses the SU marker and an aqua painter. I tried this and I found that my aqua painter lets too much water out - the colors were bleeding out of the lines. :( Blender pens work better for me.
Wednesday, December 12, 2007
Cooking
I know enough about food (my little brother's a Le Cordon Bleu trained chef) to know that the egg white marshmallow recipe is traditional. I'm a little iffy about making marshmallows that contain raw eggs. Yes, I eat raw cookie dough, but those eggs are destined to be cooked. The eggs is marshmallows aren't. What's more: marshmallows have to cure - 3 hours uncovered at room temperature. Who wants to risk it?
Okay, onto recipe 2. Created by Alton Brown for Good Eats. I LOVE this show - it's funny, knowledgeable and with the exception of stovetop macaroni and cheese (which turned out a little funny) and cream puffs (problems more than likely caused by an oven off temperature), every recipe from this show I've tried turns out. Enough raving about the show.
So I gathered all my ingredients and away I went. I made marshmallows without egg whites.
They seem to have turned out okay. I let mine cure overnight and cut them apart in this morning. I should take a picture of my pretty white pillows of fluff.
Tuesday, December 11, 2007
Coaster Tile


Sunday, December 9, 2007
Mom's Christmas gift
*headtodesk - hard*
How idiotic can I be????? I have tiles, I have stamps, I have felt disks, I CAN MAKE HER COASTERS!!!
Lord, please forgive me for being dense.
So I toddled down to the dungeon - what I call my stamping area. It's in the basement, unfinished, and at this time of year, COLD. I pulled the tiles out of their box and wiped them down with a face wipe - which are downstairs for the times when the scrub's upstairs and drying.
9 marble tiles for $5-something - not a bad deal. I had gone through the box at the store to see if they were really pitted and not good for what I was planning - and I'd grabbed a good box right off the bat. 1 tile has a crack that's visible on the top and bottom - other than that, the rest are good.
What I learned today: Palette Burnt Umber works nicely for stamping on marble - and if you leave it alone for long enough, it dries without heat setting. Wild Wasabi Classic ink does the same thing - only it takes longer to dry.
I stamped, then let dry for an hour or 2. Mostly because it's cold in the basement and I got distracted doing something else. I then went down and colored in the image with my SU Stampin' Pastels.
I need to seal my tiles - hopefully tomorrow.
I'll try to remember to take a picture when I seal the tiles.
Saturday, December 8, 2007
Feeling Guilty
New Bellas came out tonight - Friday - and I bought some of those too.
I'm feeling guilty that I'm buying stuff for me at Christmas time. I think I'll get them, look at them, then put them away until after Christmas - so I don't feel as guilty. Maybe I'll give them to someone to wrap up and put under the tree.
I'm going to resist the lure of Papertrey next Saturday too. I don't need them. I'M NOT LETTING MYSELF GET ANY MORE STAMPS UNTIL JANUARY/FEBRUARY - my accounts need a break.
I came up with an idea for what to give Mom for Christmas. I hope it turns out the way I think it will. :)
If only to figure out what to get Dad.
Thursday, December 6, 2007
STVV02 - Frosty the Snowman

- Card Base is Garden Green - regular size: 4 1/4" x 5 1/2"
- Layers of Bordering Blue and Close to Cocoa
- Snowman is my new Penny Black Frosty stamp - inked in Bordering Blue.
- I masked the snowman and then stamped the truck from Loads of Love in Garden Green.
- I used my Prismacolor pencils to color in the truck, draw a road and snowdrifts in the background. I also shaded the snowman.
- I paper pierced the edge of the Bordering Blue level.
- I added 2 large eyelets from We R Memory Keepers and some May Arts ribbon.
Reminiscing about MFT


Tuesday, December 4, 2007
Matchbook card tutorial
So, after I got home from work today, I went downstairs and CLEANED my stamp table - it needed it. Besides, I needed a clean place to take pictures.
How to make a Matchbook card:
 Here are the supplies I used:
My paper cutter; adhesive; Sidekick Sayings; Stapler; Tacky Tape; Real Red 1/4" grosgrain; corner rounder (the retired one); snowflake brads; Old Olive and Real Red Classic ink (I know Mellow Moss is in the picture, but I didn't use it on the card.); Dashing Designer Paper; Mellow Moss, Real Red, Old Olive and Very Vanilla cardstock; Pop Dots; and Crimson Red, Marine Green, Limepeel and White (not pictured) Primsacolor pencils.
 Cut the card base. I used Mellow Moss 8 1/2"x11" paper. I cut it so that I had 4 1/4"x11".
 I scored the cardstock at 1 1/2" and then at 6 7/8". The height of the card is just under the normal 5 1/2", but you need to make it slightly smaller to get the overlap so it closes properly.
 I chose to round the corners of my front flap to add a little detail.
 To decorate the flap (and hide the front of the staple, I cut a piece of Real Red cardstock to 4" wide and 1 1/4" tall. I rounded the corners when I finished cutting.

 I taped the embellished layers onto my card - see the Mellow Moss around the Real Red? It's taped on with regular adhesive.
 Decorating the part of the card that moves. I started with a piece of Old Olive cardstock cut to 4" wide and 3 3/4" tall to make sure that part of it didn't get in the way of the flap.
 Cut another piece of Dashing dp to layer on top of the Old Olive. This piece is 3 3/4" wide and 3 1/2" tall.
 I measured out the size of the acutal rubber on my stamp and it was about 2" wide and 3" tall. I cut a piece of Very Vanilla cardstock to fit the stamp.
 The image was inked with Old Olive on the tree and Real Red for the words. I did this with my ink pads, but it would be easier if you used markers.
 Thanks to a wonderful person on Splitcoast Stampers, there is a list of Prismacolor colored pencils and markers match SU colors. This list is one of my best friends. I downloaded the list, and hit the art stores. If you're interested, it's hiding in the Downloads - Lists and Charts. I used the pencils that matched the colors of my card. After I finished coloring the tree, I realized the star on top looked bland, so I grabbed my white Prismacolor pencil and colored it in.


 Add ribbon to the panel to add some texture.
 Put the image on the layer.

The completed card.
Card for today and Work Secret Santa Present Reveal

- Certainly Celery base. Gratitude is stamped in Old Olive - from Papertrey's Spiral Bouquet set.
- Layer of Summer Sun cs and Certainly Celery Prints dp. Certainly Celery grosgrain is tied around it.
- Image is from Petal Prints. Solid stamped first: Summer Sun which was inked and stamped off before adding the Certainly Celery to the stamp. Outline was inked in full strength Summer Sun and Old Olive.
- Ticket corner punch was used on the corners and Bella Baubles in Pickle (here comes the food again) were glued in indents.
- Interesting tidbit: This card started life intending to be vertical instead of horizontal. Everything was laid out (untaped) and I stamped the Gratitude. I didn't like the thought of it going up the card, so I turned the card and rearranged the layers.
This card is going to my demo - who let me borrow her Petal Prints. She also put up with me for 3 hours while I was doing a stamp camp of 1. I felt like I was taking FOREVAH to work on it. She's just wonderful and I'm glad she's my demo.
The project I'm going to reveal is part of my Work Gift exchange present. Since I've been really into making presents (and I had a cap of $20), I wanted to stamp on a candle as part of the gift. After I got the brand new candle home, I started looking through my sets and realized that there wasn't a set I NEEDED to use on this project. If I'm not inspired...
Thankfully, every time I walk down the embellishment aisle at Michaels, inspiration sits at ankle level - they have a candle all dressed up with brads and swirly clips. I want to do that! I'd run across a tutorial on a blog - I think it belonged to texasjodylynn, but I can't totally remember - on how to glitter large brads. Well, brads are expensive, and they have those prongy thingies that would be a pain to get into the candle... THUMBTACKS are like brads - cheaper (I got 80 for 80 cents at Walmart) and they only have the pokey part.
The great experiment starts. Tongs for holding thumbtack, Check; heat tool heating it for 15 seconds, check; open jar of Heat and Stick powder to dip thumbtack in when hot, check. If the thumbtack's hot enough, the powder will liquefy on contact. Then proceed to dip into glitter to coat. IT WORKED!!!
I made 12 of them and stuck them into the candle. Easy as that.
I just checked texasjodylynn's blog - I WAS RIGHT! Here's the link: http://confessionsofaribbonaddict.blogspot.com/2007/11/beadedglittered-chipboard-flower.html
Monday, December 3, 2007
Stalker Color Challenge 7 - tutorial to follow

- Card base is Purely Pomegranate - unfolded and unstapled, it's 4 1/2"x11"
- All images are from True Friend.
- Sentiment block is Whisper White with the sentiment stamped in Certainly Celery. This is layered on Chocolate Chip. I used dimensionals so I didn't have to lay this directly on top of the staples. Ticket Corner punch and rhinestones embellish it.
- I used the spiral punch to add detail to my piece of Sahara Sand cardstock. I also stamped it with Purely Pomegranate and marked the middle of the fowers with mini black brads.
- The main image is inked in Sahara Sand and rolled in Chocolate Chip ink. I paper pierced some of the dots around the flower so the Certainly Celery underneath shows through. A black brad marks the middle.
- The upper design is held in place with Tacky Tape - otherwise it keeps popping off when you bend it slightly to close the card.
Sunday, December 2, 2007
Elf cards and Featured Stamper - Rose Ann

- Card is based around the DP which I found at my LSS - Daisy Bucket.
- I don't have cardstock the dusky rose color, so I pull my colors out of the stripes in the background - perfect matches for Wild Wasabi and Rose Red.
- Card base is Wild Wasabi.
- Main sentiment is from Lexicon of Love, stamped in Wild Wasabi with a snowflake from Snowflake Serenade stamped off in Rose Red in the "background." This is layered on Rose Red detailed with the spiral punch.
- The other sentiment is from Riveting. It's stamped in Rose Red, punched out with the 1 1/4" circle punch. It's layered on a 1 3/8" circle of Rose Red, layered on a scalloped circle of the DP.
- The middle of the circles is more DP punched out with the 1/2" circle punch.
- The whole circle sentiment stuff is popped up on dimensionals.
- I used Wild Wasabi DS ribbon for my criss-cross.
- 3 brads at the top of the card complete it.
I hope my Elf people like their cards and gifts.
Saturday, December 1, 2007
STVV - Brand New Challenge...

- Card is a 5.5" square of Green Galore. I think that this color reminds me of new grass. Of course it's also the color of appletinis.
- Next layer up is Georgia Pacific white cardstock brayered on the bottom 2/3s with Green Galore. The upper part is sponged with Soft Sky ink.
- The umbrella. Here comes the sun? Sunny days need shade. I found a piece of DP at my LSS which was all umbrellas, so I cut a big red one out. I put a star brad at the top.
- I've had Grillafella for a while and he hasn't been inked up yet. But he was perfect for my card. I also didn't want him to be lonely, so Cosmobella came out for the party too - appletini in hand. They're both colored in with Prismacolor pencils.
- What I've learned: Double sided tape doesn't seem to stick very well to brayered surfaces - as I type, it looks like Grillafella's grill is trying to make a run for it.
Wednesday, November 28, 2007
Sketch Challenge and a commentary on primas

- I started with the DP as my inspiration. It's from Scenic Route and I found it in the clearance section of my LSS. I love sales.
- The colors for the card: More Mustard, Garden Green, and Bashful Blue. If someone had asked me 6 months ago (just after I joined SCS and started making cards everyday) what colors I don't use: I'd have said "More Mustard" along with other assorted colors I can't seem to live without.
- Apparently math isn't my strong point when I first get up. I wanted the panels to be closer together with just a hint of the More Mustard peeking through. I made the gaps too big. I realized it AFTER I had the card put together.
- I only used 1 stamp on this card: my sentiment running up the side of the card. It's stamped in Versafine black.
- I added some primas and brads into the big panel to add a little contrast and texture.
I am addicted to little paper flowers. Seriously. When I go to my LSS, I tell myself "no primas" but then I can't help but see what they have - and then I tend to buy a package. There are so many things I've been introduced to in the 6 1/2 months I've been on SCS - primas being the big thing I tend to buy a LOT of. I initially had sticker shock when I saw how much a bottle of primas cost - then I realized how MUCH is in one of those bottles. It evens out. I have enough of them that I could use 1 a day and more than likely not run out until at least late 2009 at the EARLIEST.
Just thought I'd share.
Monday, November 26, 2007
Monday - double challenge post

First challenge was Faith's last time hostessing the Stalker's Thread Color Challenge. She chose Real Red, Handsome Hunter, Mellow Moss and Old Olive. Hello green!
- I chose to use Papertrey's Snowflake Serenade as my background stamped in all the colors of the challenge.
- The main image is from SU! The World Over. It's stamped in Basic Gray and colored in with my Prismacolor pencils.
- I wanted to add a little punch (and some ribbon) so I tied some Real Red grosgrain around my background 3 times and pulled the knots to the bottom.

The other challenge was the Technique Lover's Challenge: Clear sleeved Nugget boxes. Now, I'd heard about Nugget tins - I have a bunch, courtesy of a buy with a friend on SCS - but I'd never heard of Nugget boxes. I followed the links to the different sized boxes - I'd like to thank that person - they did a great job.
- Bottom of my box is a piece of Scenic Route paper - it's vanilla with an olive pattern on it. There's no tape holding it together - it's just folded.
- The slide is a piece of acetate (like a transparency) that's leftover from when I made an acetate card. It's held together with 3 brads.
- The nuggets are wrapped with an address label stamped with a snowflake from Snowflake Serenade in Old Olive.
- The slide is tied with a piece of olive velvet ribbon.
Sunday, November 25, 2007
Featured Stamper: TexasGrammy

- While I do have the set Paint Prints, I wanted to do something similar with a different set - I chose Delight in Life.
- I kept the sentiment set the same - chose another word out of the set.
- Perfect Plum and Mellow Moss were the first SU stamp pads I bought, but I didn't want to CASE too closely. I really like Groovy Guava and Barely Banana as a combo - they're warm colors and since it's barely above freezing outside right now, I love warm colors.
- Instead of using the folded white that's torn, I masked above the sentiment and sponged with Barely Banana. Keeping the mask in place, I also stamped my flowers.
- I wanted to put some embellishment on the card, so I added 3 black brads.
I just wanted to say my VSN mini challenge is officially over. It was a lot of fun and I'm glad that a lot of people participated - I was afraid that no one would do it. *roll eyes* The next VSN mini is on December 5th - it's a Wednesday - at 7pm EST.
Friday, November 23, 2007
So behind with the cards
I've been making cards though.
I've been keeping up on some of the regular SCS challenges and I did all but the new inspiration challenge that just started in the ST- line this week. Next week, there's going to be another new challenge, started by... ME! Fridays will have the STVV - Stalker Thread Visualize Verses which will be explained in my first challenge. I can't wait to start this!
I'll make sure I'm posting cards pretty soon.
Sunday, November 18, 2007
Shelly's turn to shine!!!

I've been a bad friend, though. I haven't been looking through her gallery (or anyone else's really) so when I looked through it, I was blown away by the gorgeousness of her cards.
I picked her Fleur D Harlequin card to CASE. If you're curious, her card is: http://www.splitcoaststampers.com/gallery/photo/674717
- One of the LSS we've been to had this gorgeous May Arts organdy ribbon. You can't really see it on the card, but it's variegated from aqua to brown, which is the inspiration for the Blue Bayou and Chocolate Chip on the card.
- Instead of stamping out diamonds, I cut diamonds out of Groovy Guava Prints paper.
- The layer beneath the diamonds has swirls from Priceless stamped in Blue Bayou.
- The "s" is Basic Grey chipboard embossed several times with silver embossing powder. **Note: if you're embossing on chipboard, it doesn't cool off as quickly as paper, so leave it alone for a few minutes before you run your finger over it to see how smooth it is. You'll pull part of the embossing powder off. I learned this to my detriment today.
- I don't have vintage brads - I need to ask Shelly where she got hers because they're really cool. I used clear rhinestone brads - and twisted my ribbon to "pinch" it at the brads.
This card is being sent to Shelly in the mail tomorrow. :)
Thursday, November 15, 2007
Unusual request for a crafting blog
I work at a daycare center and I'm starting to think of things to do for the summer already. The theme this summer is Around the World in 55 days. I'm hoping to find simple to create (or find in the grocery store) kid-friendly snacks from around the world.
If you have an idea for me and my work, please comment on this post with either a link to a recipe or the recipe itself. If you could also tell me where the snack originates from, that would be greatly appreciated.
I really appreciate whatever you can send me in way of ideas.
Pearlized Thanks

- Card base is Certainly Celery
- My lovely pentagon layers are Almost Amethyst cs and Certainly Celery Prints dp.
- The sentiment is stamped in Almost Amethyst. It's from Happy Harmony and is punched out with a super jumbo scalloped oval
- The main image is from The Art of Life. It's inked in Certainly Celery and Almost Amethyst inks and layered on a piece of Almost Amethyst.
- The layers of Almost Amethyst blend together, so I took a black marker and faux stitched around the edge of the image layer to create some definition.
- I used my crop-a dile to create some holes to thread ribbon through so I could tie a ribbon around my flower.
This card is going to a friend on SCS who is completely wonderful.
Wednesday, November 14, 2007
SC150 Mousie Get Better

- Base is Chocolate Chip
- Next layer up is Close to Cocoa Prints DP. I used the tag corner punch on the corners (where else?) and then glued rhinestones to the Chocolate Chip layer for a little sparkle.
- The ribbon is from Hobby Lobby and it's wrapped around the Close to Cocoa layer. It's a VERY close match to Mellow Moss.
- The House Mouse image is stamped in Basic Gray ink and only the blanket is colored. I colored it with a Prismacolor pencil that matches Mellow Moss.
- The sentiment is from Quick Thinking and is stamped in Groovy Guava.
- Mellow Moss and Groovy Guava are the "framing" layers for the main image. I pierced the corners of the Mellow Moss layer with my paper piercer.
- The image and its layers are popped up on dimensionals.
As I was naming this card, I thought of something that happened at work about a month ago. I work at a daycare center, so I have a lot of cute stories of what kids say. We have this little boy - B - who's autistic and he's the sweetest little kid ever. He's also hilarious. We have a dwarf hampster at daycare for the kids to look at and towards the end of the day - when there's not 40 kids running around making lots and lots of noise, GusGus (the hampster) graces us with his presence. Okay, backstory over. It was the end of the day and us teachers are cleaning up, making sure the fish and GusGus are fed for the night and GusGus comes out to run on his wheel. B saw this and was so excited that "Mousie" - what B called him - was out and running. He then encouraged GusGus to run by saying "Run Mousie, Run!" All I can think of is Forrest Gump and I'm trying not to laugh. But "Mousie" was running and B was happy.
Just had to share.
Monday, November 12, 2007
CONGRATS!!!!
In my highly scientific way of choosing who won - asking a friend to pick between 1 and 15 - your number came up!
If you would email me at deipara@yahoo.com with your address, I'll get your candy out to you hopefully by the end of the week!
Saturday, November 10, 2007
November Mini VSN - on NOW!!
4 challenges
No time limits
2 weeks to post your card/projects
LOTS and LOTS of fun!
My Challenge: http://www.splitcoaststampers.com/forums/showthread.php?t=299848
100 Views
So... I'm going to offer a little blog candy. I need to decide what to give - I'll post a picture after I choose what to give away. **which I just did - it's down below**
So... the challenge:
http://www.splitcoaststampers.com/gallery/showgallery.php?cat=500&ppuser=123359
This is my gallery on SCS - pick your favorite card and tell me why in a comment here. :)
Have fun!

*Can you tell I'm new at this blog candy stuff? I'll choose the winner Monday Morning - about 9am EST.*
Thursday, November 8, 2007
Butterflies and DP flowers
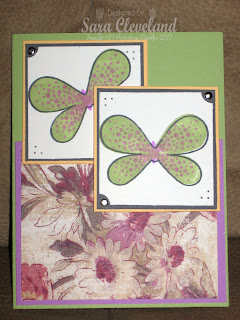
- It's gloomy here, so I wanted a bright color palette to work with. What's brighter than Orchid Opulence? I added Certainly Celery and Apricot Appeal to the cardstock pile as well. The Basic Gray is there to tone down a little.
- I wanted to use DP - designed paper - on the card somewhere. So I dug through my stash and found the piece of Wild Asparagus paper - reason I'm using it? Under the lower butterfly there's purple shading that is REALLY close to Orchid Opulence.
- The butterflies are Basic Gray outline, Certainly Celery wings, and Orchid Opulence detail bubbles.
- The layers underneath the butterflies are Basic Gray and Apricot Appeal.
To be perfectly honest, I think I've created the ugliest card evah.