
So, after I got home from work today, I went downstairs and CLEANED my stamp table - it needed it. Besides, I needed a clean place to take pictures.
How to make a Matchbook card:
 Here are the supplies I used:
My paper cutter; adhesive; Sidekick Sayings; Stapler; Tacky Tape; Real Red 1/4" grosgrain; corner rounder (the retired one); snowflake brads; Old Olive and Real Red Classic ink (I know Mellow Moss is in the picture, but I didn't use it on the card.); Dashing Designer Paper; Mellow Moss, Real Red, Old Olive and Very Vanilla cardstock; Pop Dots; and Crimson Red, Marine Green, Limepeel and White (not pictured) Primsacolor pencils.
 Cut the card base. I used Mellow Moss 8 1/2"x11" paper. I cut it so that I had 4 1/4"x11".
 I scored the cardstock at 1 1/2" and then at 6 7/8". The height of the card is just under the normal 5 1/2", but you need to make it slightly smaller to get the overlap so it closes properly.
 I chose to round the corners of my front flap to add a little detail.
 To decorate the flap (and hide the front of the staple, I cut a piece of Real Red cardstock to 4" wide and 1 1/4" tall. I rounded the corners when I finished cutting.
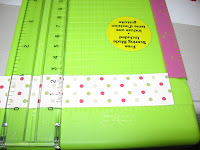

 I taped the embellished layers onto my card - see the Mellow Moss around the Real Red? It's taped on with regular adhesive.
 Decorating the part of the card that moves. I started with a piece of Old Olive cardstock cut to 4" wide and 3 3/4" tall to make sure that part of it didn't get in the way of the flap.
 Cut another piece of Dashing dp to layer on top of the Old Olive. This piece is 3 3/4" wide and 3 1/2" tall.
 I measured out the size of the acutal rubber on my stamp and it was about 2" wide and 3" tall. I cut a piece of Very Vanilla cardstock to fit the stamp.
 The image was inked with Old Olive on the tree and Real Red for the words. I did this with my ink pads, but it would be easier if you used markers.
 Thanks to a wonderful person on Splitcoast Stampers, there is a list of Prismacolor colored pencils and markers match SU colors. This list is one of my best friends. I downloaded the list, and hit the art stores. If you're interested, it's hiding in the Downloads - Lists and Charts. I used the pencils that matched the colors of my card. After I finished coloring the tree, I realized the star on top looked bland, so I grabbed my white Prismacolor pencil and colored it in.


 Add ribbon to the panel to add some texture.
 Put the image on the layer.

The completed card.
3 comments:
very nice Sara
What an AMAZING Tutorial. This is perfectly done and such a sweet sweet card!! TFS!!!!
Vicki
Great tutorial; I've added it to my favorites so I can come back and give this a try. Thanks for all the work in putting this together.
Post a Comment